
vSphere Import
The screenshots illustrate the English user interface. Names and addresses shown are examples; use the values defined for your environment.
1. Before you begin
Requirements
- Administrator access to eEVOS.
- Network connectivity from eEVOS to vCenter Server or ESXi over HTTPS.
- Valid VMware credentials with inventory, power-management, and export privileges.
- Sufficient free capacity on the target eEVOS drive.
- A maintenance window for VM shutdown and export.
- A defined destination eEVOS network for each source port group that should remain connected.
Open the feature
In the eEVOS GUI, open VM Tools → vSphere Import. The overview contains Start vSphere Import, Manage connections, VM Management, and Refresh.
2. Manage connections
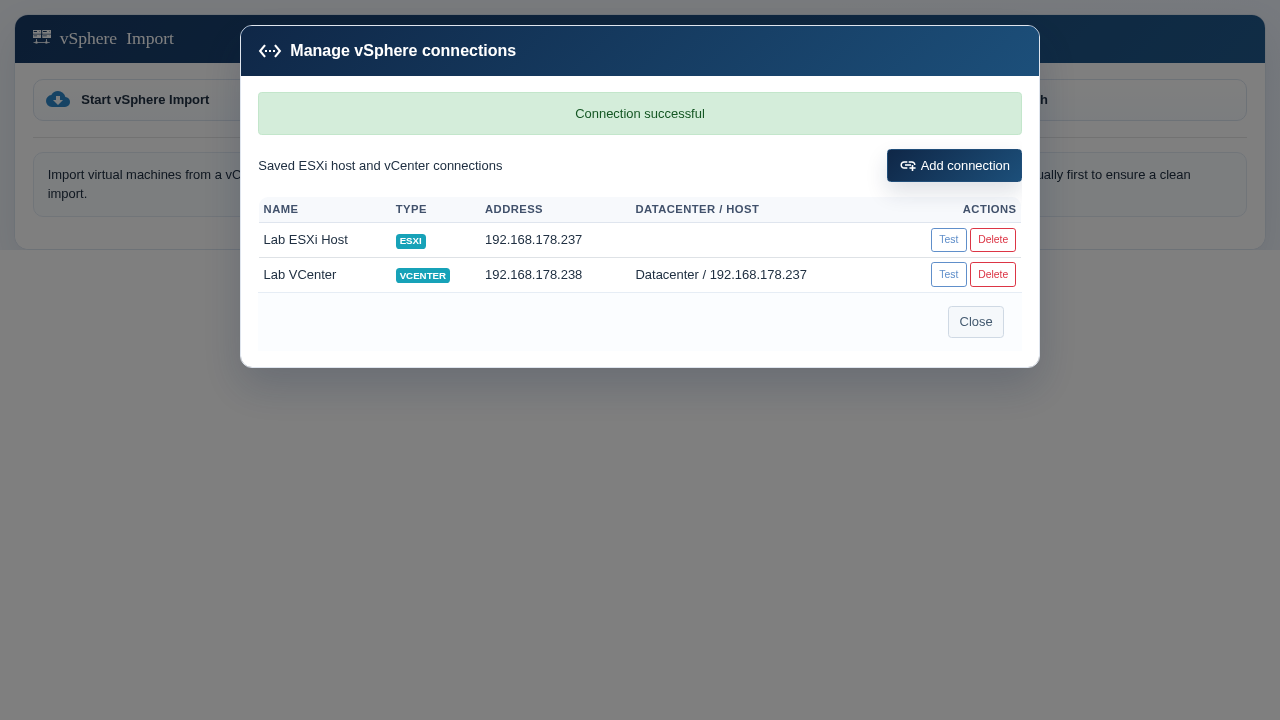
- Select Manage connections.
- Review saved sources. The type is shown as VCENTER or ESXI.
- Select Test to validate a source. A successful test displays only Connection successful.
- Select Delete to remove a source. Confirm the prompt.
Choose the correct connection type
| Type | Enter | VM and host discovery | Use when |
|---|---|---|---|
| vCenter Server | vCenter address, datacenter, user name, and password | VMs are discovered across the datacenter. The owning ESXi host is resolved automatically for each VM. Do not enter an ESXi address. | The hosts are managed by vCenter, especially when the datacenter contains multiple hosts. |
| Standalone ESXi Host | ESXi host address, user name, and password | Only VMs registered on that host are discovered. The connection address is shown as the host in job status. | The host is not managed through vCenter, or the import should be limited to that host. |
runtime.host relationship from vCenter. VMs from different ESXi hosts can be selected in one batch; each VM retains its own resolved host in the import command and Jobs table.Add a connection
- From the connection manager, select Add connection.
- Enter a unique friendly connection name.
- Select vCenter Server or Standalone ESXi Host.
- Enter the source IP address: the vCenter address for a vCenter connection, or the ESXi address for a standalone-host connection.
- For vCenter, enter the datacenter. The ESXi host is discovered automatically and is not requested.
- Enter the VMware user name and password.
- Select Save connection.
Saving returns to the connection list and does not start an import. Spaces are preserved in the friendly name; the internal source ID uses a normalized hyphenated form.
3. Run an import
Step 1 — Choose how to connect
- Select Start vSphere Import.
- Select Use saved connection or Connect new source.
- If using a saved source, choose it and select Next.
- If connecting temporarily, choose the source type and enter the required address and credentials. Optionally save it for later use.
- For vCenter, enter the vCenter address and datacenter; do not enter an ESXi host. For standalone ESXi, enter the ESXi address as the source.
Step 2 — Select VMs and target storage
The wizard lists discovered VMs and their power states. With vCenter, the list may contain VMs from several managed hosts; eEVOS resolves the current host independently for each VM. For every VM, choose one of:
- Do not import
- A target eEVOS drive
- Overwrite existing VM when a VM with the same name already exists
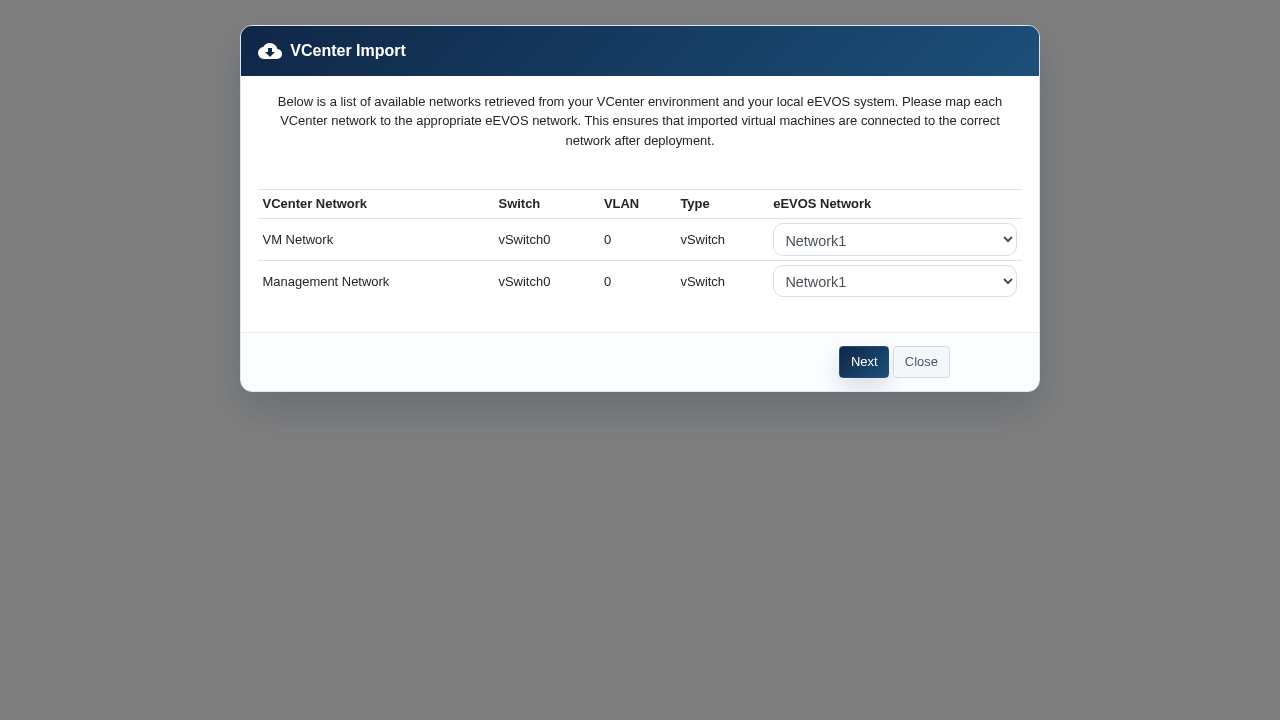
Step 3 — Map networks
Map each VMware source network to an eEVOS network. Select Do not connect to omit only the adapters attached to a particular source network, or select Import without network adapters to omit every NIC from all selected VMs. A VM imported without adapters has no network connectivity until an adapter is added in VM Management. If VMware reports no source networks, the wizard permits the import only after the administrator explicitly confirms a networkless import.
Step 4 — Start
Review the choices and start the import. The GUI returns a Job ID. Multiple selected VMs are processed sequentially; pending VMs are marked Queued. For vCenter jobs, the Host column identifies the automatically resolved ESXi host for each VM.
4. Monitor jobs
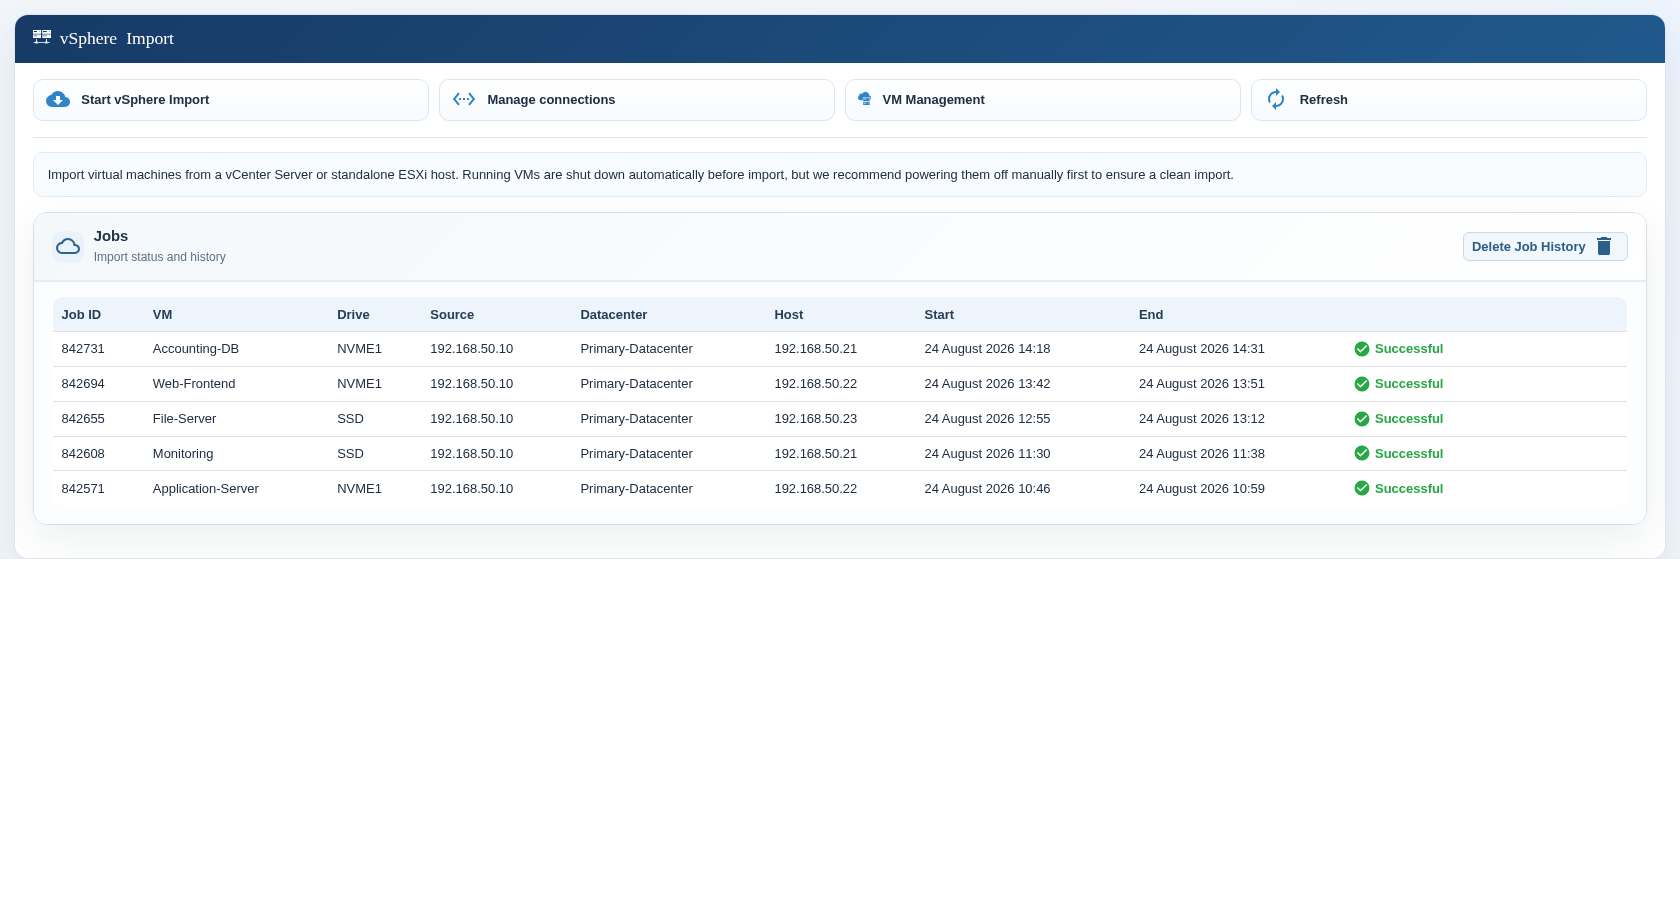
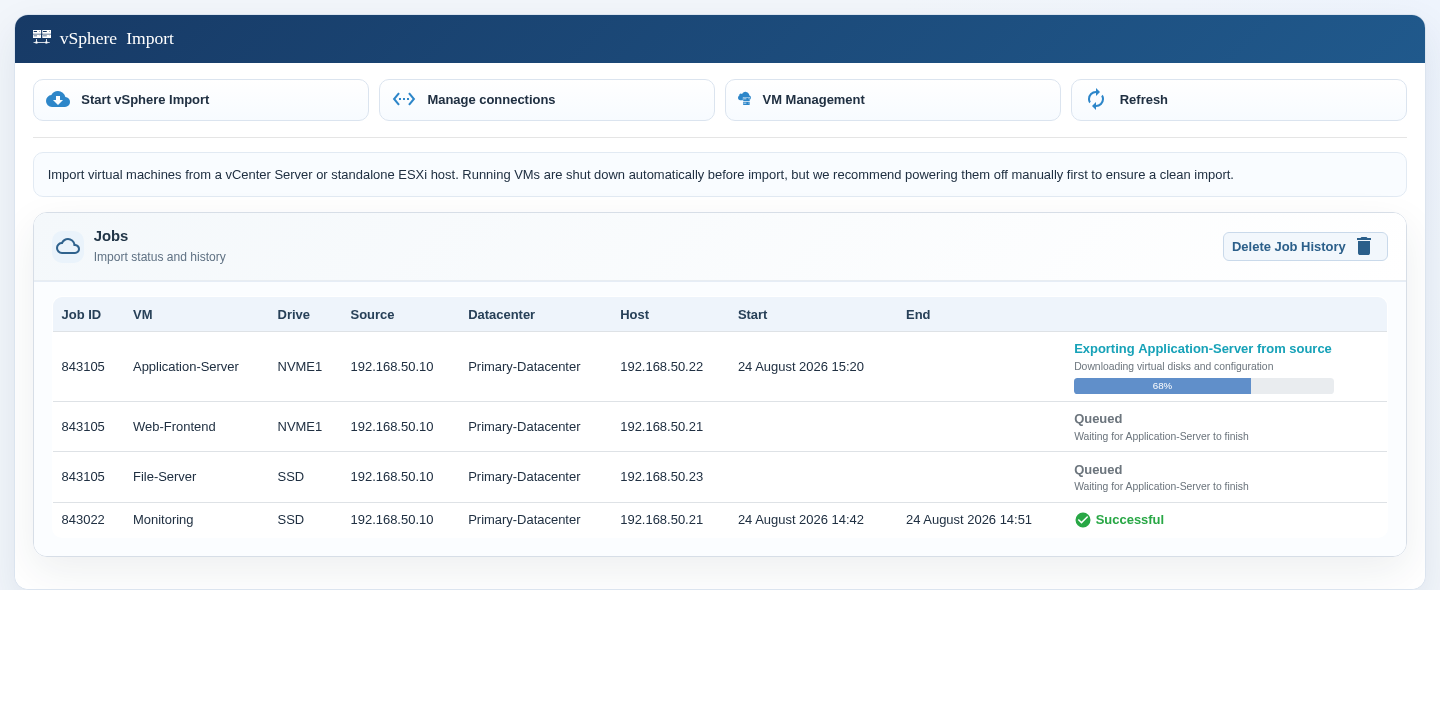
The overview refreshes automatically. Each row includes Job ID, VM, target drive, source, datacenter, host, start/end time, and status.
| Status | Meaning |
|---|---|
| Preparing import for VM | Checking state or waiting for a graceful shutdown. |
| Exporting VM from source | OVF configuration and virtual disks are being downloaded. |
| Converting VM to eEVOS format | Disk conversion is running; a percentage is shown where available. |
| Queued | The VM is waiting for the current VM in the batch. |
| Successful | The VM was registered and all disk conversions completed. |
| Failure in red | The row contains a persistent error reason. |
Cancel running jobs terminates the active batch. Delete Job History removes historical records and should be used only after required audit information has been retained.
5. Validate the imported VM
- Open VM Management.
- Confirm the VM name, CPU count, memory, firmware mode, and guest OS type.
- Confirm all expected disks and their sizes.
- Confirm each included NIC is connected to the intended eEVOS network. For a networkless import, confirm that no NIC is present and add one later if required.
- Start the VM and watch the console for boot or driver errors.
- Verify IP addressing, guest tools/agents, time synchronization, application services, and external connectivity when networking is enabled.
- Obtain application-owner approval before retiring the VMware source.
6. Troubleshooting
| Symptom | Checks and resolution |
|---|---|
| Unable to connect | Verify source IP, routing/firewall, HTTPS access, credentials, and whether the selected type is vCenter or ESXi. |
| No VMs found | Read the detailed connection/discovery error. For vCenter, verify the datacenter and confirm that the account can browse VM and host inventory. The ESXi host is resolved automatically and is not a connection field. |
| Unexpected host in Jobs | For vCenter, the Host column is the ESXi host reported by vCenter for that VM during discovery. Refresh the wizard inventory after a vMotion operation before starting the import. |
| Shutdown timeout | The VM did not power off within 150 seconds. Shut it down from the guest or VMware console, confirm Powered Off, then retry. |
| Export fails | Verify OVF Tool connectivity and privileges, target free space, and that the VM inventory path still exists. |
| Conversion stalls | Check target capacity and system load. Review /tmp/debug_qemu-img_conversion_<VM> and system logs. |
| Wrong network after boot | Power off the imported VM, correct its eEVOS network assignment, then restart. |
Logs
Filter /var/log/nas.log for the tag vcenter_import. Important events include vm_discovered (including the resolved host), vm_shutdown_started, vm_export_started, vm_export_complete, disk_conversion_started, disk_conversion_complete, and vm_import_complete.
7. Reference
| Item | Location |
|---|---|
| Management page | /cgi-bin/migration5/ts_vcenter_import_management.cgi |
| Import wizard | /cgi-bin/migration5/ts_vcenter_import.cgi |
| Saved source definitions | /nasprivate/settings/vcenter_import_sources/sources |
| Credentials key | /nasprivate/settings/vcenter_import_sources/source_credentials.key |
| Persistent job history | /nasprivate/system/vcenter_import |
| Primary log tag | vcenter_import |